Reminiscences – Total Solar Eclipse – April 2024
Total Solar Eclipse (TSE) is a great celestial event. Hardly a month has passed since I witnessed this celestial event on April 8, 2024 and I am already reminiscing about it!
Here are my detailed notes about what went into planning for this event and what transpired on that day!
Location
We know timetable for eclipses for next 2000 years. Hence I started planning for the event of April 8, 2024 well in advance, just when the COVID pandemic started receding in 2022. This TSE was going to be visible in parts of Mexico, the US and Canada. I decided to view it from the US as among the three countries it was the easiest for me to travel to the US.
TSE was going to be visible in multiple places in various states in the US. I studied past weather data for multiple states for month of April and figured that it would be better to view the TSE from the southern part of the United States. I also faintly remember reading a NASA report stating cloud cover shall be little bit less than normal in April 2024 in southern parts of the US due to effects of El Nino. This implied that I look for a suitable place in Texas, Oklahoma or Arkansas. Another dilemma was whether to try to choose a location close or on the center line of TSE to experience maximum duration of totality or choose a location little bit away from center line of TSE so that I get better pictures of Diamond rings! An amateur astronomer friend Dr. Abhay Deshpande had told me, I will get better Diamond ring pictures little bit away for the center line of the TSE. Another factor to consider was, we needed a “biggish” resort as we were going to be a party of at least 12 persons. It was proving a little bit difficult to find a place in the path of TSE that fulfilled all these requirements.
One day, out of blue, Dr. Shashank Heda a friend called and asked if I was looking for a suitable place to view the eclipse and offered a property that he had acquired recently. The property was in Arkansas in a town called Bismarck close to town of Hot Springs and airport at Little Rock. Property was very much in path of totality, little bit away from the center line and big enough to easily accommodate more than 15 persons. This is how I zeroed in on the location from where we will view the eclipse – Antlers at DeGray! It eventually turned out to be an excellent location as I have described below.
Equipment
It was difficult for me to finalize the equipment that I shall use for shooting the TSE. There were multiple options to consider – if I will use a telescope or a usual camera lens, whether I will use a DSLR/Mirrorless camera or an Astro-camera, equatorial mount or a plain and simple camera tripod. Whether I will use equipment that I own or will I in addition rent something. How will I fit all this in my baggage while traveling from my home in Mumbai to location of TSE in the US. So many decisions to make!
I think most important decisions to arrive at were “at what focal length shall I shoot the TSE” and whether I will use a full frame sensor camera or a cropped sensor camera. But I am completely sold on using full frame sensor cameras!! So that decision was more or less “automatic”!!
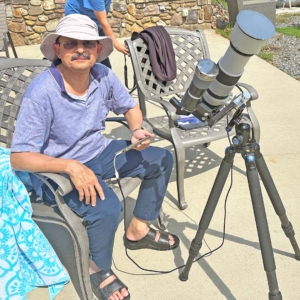
As in the case of previous TSEs, I was guided by NASA eclipse expert Fred Espenak’s article about focal lengths suitable to shoot TSE and exposures to select for various stages of the TSE. This more than 25 years old article is as relevant today as it must have been when originally published so many years back! Based on the article and my wish/hope to shoot the solar corona during totality in all its glory, I decided to shoot the eclipse at anywhere between 300 mm to 600 mm focal length. This would enable me to shoot the corona in great detail and even if I was not able to keep the Sun in the center of the frame all the time, I would not lose any details. This greatly simplified my decision-making process as I could shoot the TSE using my Canon R5 camera with Canon RF 100-500 mm lens at 500 mm focal length. I was in two minds whether to carry a lighter/portable mount like Fornax Lightrack II or a conventional tripod. After a lot of thought I decided in favor of traveling with lesser weight and chose to use a tripod, even if that meant I would need to keep adjusting the camera angle to keep the Sun in frame at all times.
I then did some study of angles at which I shall need to shoot the TSE from the location I had selected. I deduced that the Sun shall be at or around 65 degrees altitude from horizon during the duration of the eclipse. This is a very tricky angle to shoot at. I would need to be in very awkward position to be able to see and aim at the Sun via the camera view finder. I also figured the articulating LCD screen of the camera would not be a great help while aiming at the Sun. I then had a detailed discussion with another amateur astronomer friend Anurag Shevade. He suggested that I use a 50 mm focal length right angle finder-scope (a telescope with short focal length but has its viewfinder/eyepiece at 90 degrees to the optical tube), mount both the camera and the finder scope on a Vixen dovetail, insert the dovetail in a dovetail saddle, balance weight of camera and finder scope evenly in the saddle by sliding the dovetail appropriately, and attach the saddle to quick release plate of the ball head that I was planning to use with the tripod. He further suggested that I align the camera and finder-scope using a distant object before the eclipse begins such that the distant object is both in the cross hair of the finder-scope and in the middle of camera frame. Thereafter I could use the finder-scope to aim at the Sun – finder-scope has wide field of view (50 mm focal length as against the 500 mm focal length of the camera lens). I will be able to get the Sun in cross hair of finder-scope relatively easily – thereby also getting it in the center of camera frame. Right angle finder-scope will enable me to have a very comfortable posture while I am aiming at the Sun. This was an excellent suggestion.
Next step in preparation of the equipment was to make the solar filter for the camera lens and the finder-scope. I was not going to use the usual camera filter fitted with solar film as the solar filter, as unscrewing the filter just before totality and screwing it on the lens again just after totality would have taken lot of precious time. Therefore, I procured a sheet of Thousand Oaks Orange Solar filter film. I needed to fit it on Canon lens hood. But the lens hood is conical – its diameter increases with the distance from lens edge. Usual plastic cylinder shape filter contraption would not fit on the lens hood due to its odd shape. A special conical contraption needed to be fabricated that I could easily insert into and take out of Canon lens hood very very quickly. I could then stick the solar film on the end of the conical contraption to convert it into a solar filter. I decided to make this contraption in two materials aluminium and plastic. I planned to use the one made out of aluminium to start with as it would be heavier and would not come off the lens hood accidentally, but if due to temperature variations if the snug fitting aluminium filter did not fit the lens hood at the last moment, then I planned to use the plastic one. Anurag took the responsibility of making the aluminium filter and I managed to “3D print” the plastic one from a local vendor. I stuck the solar film on both the contraptions. Right angle finder scope had a dew shield and it was not too difficult to stick the solar film on the dew shield of the finder scope. I planned to remove the solar film from the dew shield after the eclipse so that the finder scope can be used for its normal duties there after!
Final piece in the jigsaw was to identify a suitable app that I could use to control exposure of the pictures I was planning to take during various phases. Based on the table in Espenak’s article I had decided to use two sequences of exposures –
- Sequence of 7 bracketed exposures from 1/4000 s to 1/60 s during partial phases of the eclipse and during the Diamond rings around second and third contact
- Sequence of 15 bracketed exposures from 1/4000 s to 4 s seconds during the totality phase of the eclipse
All exposures would be at ISO-100 and f/8 aperture
I needed to find an app that will enable me to fire these sequences at a flick of a button and also allow me to change the two sequences at second contact and third contact. Default Canon mobile app did not support taking a sequence of 15 bracketed exposures. I did not wish to use a laptop for this purpose as I wanted to have minimum pieces of equipment while taking pictures of the TSE. I had used an excellent app by the name dslrcontroller for this purpose during the August 2017 eclipse. But that app had not been updated for past several years and did not support my camera. I had to research again for a suitable mobile app. I evaluated a few apps and finally zeroed in on an Android app by the name qDslrDashboard. I tested it with my Canon R5. I tried to connect my phone to camera by both Camera WiFi and USB cable. I determined that connection via USB cable was more reliable and decided to use that during the eclipse.
After Landing in the US
I arrived in the US about a week before the eclipse. I had managed to collect all the different pieces of equipment just before I started from Mumbai. I had tested every piece of equipment separately but I had not had a chance to assemble the full rig and test it by taking pictures of the Sun around 1 PM (time of “totality” was about 1 PM).
I therefore, assembled the rig and tried to aim at the Sun around 1 PM and realized that I had to reduce length of one leg of the tripod to achieve the angle needed to get the Sun in camera frame. I then tried to shoot the exposure sequences as decided earlier. To my horror, I realized the Sun was literally dancing in the frame especially during the slower exposures. I tried to use all the three different shutters available in the camera – mechanical, electronic first shutter and fully electronic shutter – but that did not help. I thought the rig was shaking as center of gravity of camera+finder-scope assembly was much behind the tripod center and the odd angle at which I was shooting the Sun was not helping either. Effect of the minute shake was getting amplified as the Sun is millions of miles away. I knew, I cannot do anything about the distance of the Sun from the camera or the angle of shooting! but maybe I could try and get the center of gravity of the equipment nearer the center of the tripod. I ordered a “longish” quick release plate for the ball head I was using. Plate arrived just the day before I was to travel to the location of eclipse. I again put together the rig and tried to take the exposure sequences a few times. I thought couple of times the rig did not shake. Anyway, I did not have more time to investigate as I was scheduled to fly early next morning to the location of the eclipse.
At Bismarck, AR – Location of Eclipse
Me and friends of mine, a party of 12 people (including an infant!) arrived at Antlers at DeGray on April 6 in the evening. The weather was not looking good at all for eclipse viewing. It was completely overcast. By then few of us in the party had become armchair weathermen checking multiple weather apps frequently – all predicting clouds/rains at our location for date/time of the eclipse. We were checking the app every hour hoping for improvement in the prediction but no app was showing improved weather prediction!
Morning of April 7 also was overcast with clouds all over. But as noon approached, gaps opened in the clouds and we could see the Sun clearly. We all immediately assembled our rigs, estimated the “final angles”, aimed at the Sun and took multiple pictures. Things had started looking up, literally!! All our weather apps by now were predicting better weather for the eclipse morning/afternoon.
I would not call the morning of April 8, 2024, a perfect day! There were clouds but the Sun was clearly visible and parts of sky that had no clouds were looking stunningly blue. We estimated the movement of Sun across the sky and also tried to visualize movement of clouds and estimated, we will not have clouds on or around the Sun during the eclipse.
We all assembled our rigs. I aligned the camera and finder scope. Installed the solar filters on both the camera and the finder-scope and waited for the Moon to cast its shadow on us!
First step in shooting TSE is to put your cell phone in airplane mode! No calls, no texts! I started the shooting session several minutes before the first contact. Aimed the camera at the Sun via the finder-scope. Auto-focused the camera/lens on the Sun and without touching the zoom and focus rings, carefully switched the lens to manual focus to lock the focus. Whole shooting session would be on this focus setting now. This was done as during totality light is not sufficient for the camera/lens to achieve auto-focus. Hence it was preferable to auto-focus on the Sun before eclipse began and lock the setting for the complete duration of the eclipse.
I started taking the sequence of 7 exposure every five minutes, few minutes before the eclipse begun. First important exposure sequence was of course at first contact. The eclipse had begun. I kept of the taking the sequence of exposures every 5 minutes. Adjusted the angle of the camera every 15 minutes or so to maintain the Sun closer to the center of the camera frame. I followed this process for about an hour.
The Sun phase kept on shrinking and then the Moon almost covered the Sun. The Diamond Ring appeared so immediately, magically. I shot the Diamond Ring by quickly removing the solar filter from the camera carefully. I also removed the solar goggle that I was using to view the Sun. Then the Moon appeared to cover the Sun completely!
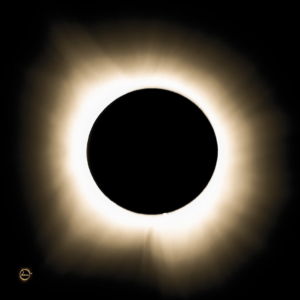
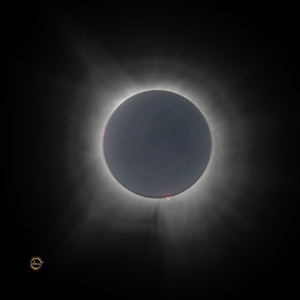
Suddenly the dazzling/blazing solar corona appeared. It was so surreal. I have no words to describe it. A solar prominence was very clearly visible around the 5 O clock position on the edge of the Sun disk. I then quickly changed the exposure sequence from 7 bracketed exposures to 15 bracketed exposures and took three sequences of 15 bracketed exposures. In between, I also viewed the eclipsed Sun and the corona by naked eyes and via a telescope. It was simply amazing.
The time of the third contact – end of totality was approaching. I quickly changed the exposure sequence back to 7 bracketed exposures. Totality ended – those three and half minutes appeared to have passed only within 17 seconds!! Second diamond ring appeared. I took two sequences of 7 bracketed exposures and then inserted the solar filter back into the Canon lens hood, ever so carefully.
We had witnessed the celestial event, no clouds, clear skies, fantastic views of the solar corona. It was literally an out of world experience.
I kept on taking sequence of 7 exposures every five minutes as the eclipse was progressing till the fourth contact when the Moon completely slipped out from front of the Sun.
As we started dismantling out respective rigs, clouds slowly started coming in. It rained cats and dogs that evening. But we did not mind it a bit. We had experienced the complete solar eclipse without any clouds! Luck had really favoured us during those three hours or so!
Postprocessing
I find this to be the most boring part of any photography session! While it was raining outside, I transferred the pictures to my laptop and had my first look at the pictures. These were my impressions:
- Exposures at 1/250 s taken during partial phases appeared to be the best among the sequence of 7 exposures.
- I had managed to capture both the Diamond Rings, with Baily’s beads, and solar prominences! I had missed the first Diamond Ring (second contact) during the August 2017 eclipse.
- I had managed to capture the corona with many features including solar flares in many of the exposures of the 15 exposure sequences. But in all the exposures slower than 1/8 s the Sun shape appeared very oblong as if the top half of the Sun was being pressed downwards, instead of the normal circular shape. My experiment of fixing the center of gravity of the rig had apparently failed. I will need to take care of this in the next eclipse.
Immediately post processed pictures of first diamond ring and solar corona and shared them on social media!

One of our party members and a friend of mine Dr. Chaitanya Joshi then mentioned to me that a friend of his who had travelled to a different location could observe two diamonds in his second Diamond ring picture. Chaitanya then shared this link to explain how two diamonds could be seen in a diamond ring picture.
We all returned to our respective bases in the US the next day.
Couple of days later, on closer look I observed even in my second Diamond ring picture there were two diamonds next to each other! Also the prominence I had observed during totality at about 5 O clock position on the edge of Sun disk, I had managed to capture beautifully in that picture.
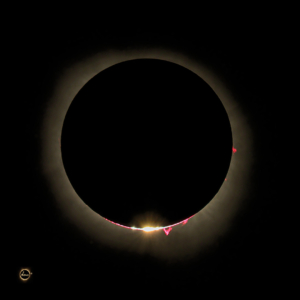
Chaitanya then realized looking at the link he had shared that our location was also on the blue band depicted in the link in the map for Arkansas, that he had shared. Blue band identified locations from where two diamonds could be visible in the second Diamond ring. Risk we had taken to go little bit off the center line (and in the process sacrificing about 35 seconds of totality duration) had paid off in getting beautiful Diamond ring pictures. Location that we had traveled to worked out to be the best for us – we could observe the eclipse from the comforts of the backyard of the property which otherwise is also a very good destination if one is planning to take few days of “cool and serene” vacation!
Toughest image to process from a TSE images sequence is the composite images of the totality showing all the features of the corona, solar prominences, solar flares, Earth shine on the surface of the Sun etc. There are many resources on the Internet describing how to do this. I referred to this and this link to create a composite image.
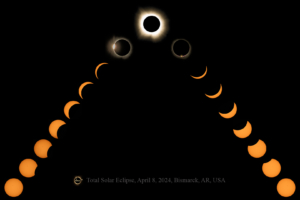
It is also customary to create a panorama of TSE images depicting the progression of the eclipse from partial phases, first diamond ring, totality, second diamond ring and then the remaining partial phases.
What next? Prepare for next Total Solar Eclipses: 2026 – Iceland and Spain, 2027 – Africa, Europe and Middle East, 2028 – Australia and New Zealand!
My April 2024 Eclipse Pictures
Amazing series, thanks Kiran had see only the pics you had posted earlier with awe now with this story I realised the passion and pain behind this.
Thanks a million.
Thanks a lot.
What a story and what are clicks.. simply beautiful.. Hats of to you and your photography
Thanks a lot.